While having a CNC mill up and running in your garage is impressive…imagine how much more impressive it could be if we could connect it to a computer (PC)? To see how I got the mill up and running from the beginning, visit my Powering the Beast page. Anyway, connecting this old mill to a computer means programs can be written for it without standing at the mill’s interface console (pendant). It also means files on the mill such as programs and settings can be written to a computer to back them up for safe keeping.
When I inspected the mill before deciding to purchase it, I noticed there was a connector (DB25 to be exact) beneath a flip up cover on the side of this old mill’s control cabinet as shown in the following picture. I’m pretty sure the gentleman I purchased the mill from never or almost never connected the mill to anything. I say this for a couple of reasons. One, when he described how they were using the machine for very simple work, my guess is they wrote programs at the mill’s console. Two, while struggling to get the mill connected to my PC, I found a blown fuse responsible for protecting the communication ports. See page 22 of the install manual to see the fuse I’m referring to. Of course I couldn’t find any of these fuses locally. In fact, before tinkering with this mill, I had never seen fuses that are tiny and basically look like through-hole resistors.
So as previously stated, the connector included on the side of this old mill is a DB25. Here’s a picture of the connector under the flip up cover. Okay so it’s not pretty, and it looks like an angry beaver gnawed a notch just big enough to fit the connector through the control cabinet. Oh well, maybe I’ll tidy it up one day, but for now I’m just happy it’s there.  In my experience DB25 (25-pin) connectors are associated with the parallel communication protocol. However, the Allen Bradley 8400MP (AB control) install and operator manuals state a serial communication protocol is used, or more specifically RS-232. Please note that when I say serial or RS-232 in this page, you can assume I consider them the same thing. Although initially confusing to me, after a bit of research it turns out the RS-232 standard recommends a DB25 connector. However, since all 25 pins are not required for a single serial communication port, the DB9 became the more popular connector associated with serial communication. It just so happens this old mill follows the RS-232 standard exactly, and utilizes a DB25 connector. I’m not trying to confuse you, just providing some background – its serial communication for sure.
For those not familiar with RS-232, it was the predecessor to USB. Unfortunately, most new PCs do not include serial connectors – DB9. This means if you want to communicate with the AB control via your PC or laptop , you’re absolutely going to to need a serial connection. As I understand it, there are inexpensive USB to RS-232 converters available (see Amazon, etc.), and they might just work for this application – I just don’t know for sure. With just a bit of googling though, I found that sometimes these USB to RS-232 converters aren’t compatible with old serial devices. To reduce the number of potential problems while initially connecting to the AB control, I decided to scrounge up an old PC that has a serial connector.
So whats the big deal right? Well, nowadays when you plug that USB device into your computer or otherwise, stuff just works. This ain’t true for devices connected via serial. If you’re not familiar with serial connection, you have to absolutely make sure the various connection settings on both sides are compatible. In this case, one side is the AB control, the other side is the PC. If these settings aren’t right, you flat out will not get a successful connection – it’s as simple as that. There are a lot of different connection settings available, and chapter 12 of the operator’s manual explains all of this in finite detail. However, if you just want to copy my settings, which should work for you as well, keep following along. The following image describes the AB control menu sequence (working from left to right) you must follow to get to the serial I/O configuration screen.

Here’s an actual screen shot of this old mill’s serial I/O configuration screen. Please notice that I have “COMPUTER” selected as the serial device being configured. This tripped me up a couple of times while initially trying to get things working.
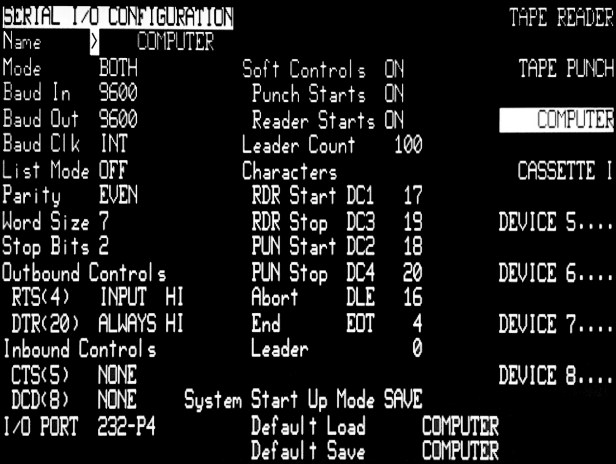
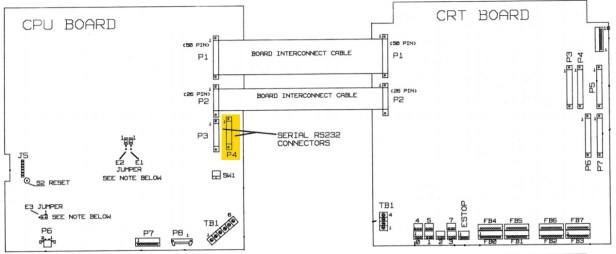
Also notice at the bottom left of the image above it states “I/O PORT 232-P4”. This means the AB control expects this serial device (the computer) to be connected to port “P4”. When you open the AB control’s clam shell style case, make sure the serial connection point intended to be used with a computer is connected to “P4” – I’ve highlighted which one it is on the image below. Of course this all assumes you’re configuring your system to duplicate what is working on this old mill.
So that finishes up the serial configuration of the AB control. However, it’s also important to make sure your PC has matching serial communication settings. The following image is a screen shot of what the serial configuration options look like on a Windows 7 PC. If using you’re using Windows 7, find the Device Manager, and find Ports (COM & LPT) on the list. In my case, the PC I’m using only has (1) serial connection, so I only had one port to select from – COM1. If you have a PC that has more than one serial connection, you’ll need to make sure you’re configuring the correct port. If you glance back up at the screen shot I included of the AB control’s serial I/O configuration screen, you’ll notice the items I have available to configure in Windows 7 match up. Again, this is very important!

I think that is about enough for this page. The next thing to do is have a serial cable capable of making the proper physical connection between the mill and PC. Visit my serial connection page to see what I’m using.
